Web Components API: Definition, Attributes And Props
Rafa Romero Dios
20 Jul 2021
•
8 min read
After learning what Web Components are, their history and benefits, it's time to dive deeper into their API component and start doing some coding.
In the following sections, we will go through the key concepts of the Web Component API, which allow us to create a Web Component:
- Definition, attributes and props
- Template, Slots, ShadowDOM vs LightDOM
- Lifecycle events and custom events
- How to style Web Components
Today we'll try to define web components and talk about two of their most important and sometimes hard to understand characteristics - attributes and properties.
Before we get started, we need to take a quick detour to a concept mentioned in the last article: custom elements.
First things first: how can a custom element be defined?
Custom elements: definition and creation
The web components creation is based on the standard ES6 Class API. As seen before, custom elements allow the definition of custom HTML tags (and therefore, DOM elements) and their attributes. Despite being custom, they are standard as well, that's why they extend for HTMLElement:
class MyCustomElement extends HTMLElement {
  // our custom element code
}
The line above is both simple and powerful. It allows us to create native HTML elements as if they were part of the official standard.
That is not all, not only are we able to create our custom elements but we can also extend the existing ones. To do that, instead of extending from the generic class HTMLElement, we have to do it from the class we want to extend from. For instance, if we want to create a custom element that extends the functionality of the native anchor element, we could do it by defining our custom element as follows:
class MyCustomElement extends HTMLAnchorElement {
  // our custom element code
}
This is what we call customized built-in elements. We'll see more of it later when we talk about web components' composition.
As our custom element class is extending from a different one, in order to follow the inheritance hierarchy, it is required to establish the correct prototype chain and set this value before any further code is run, to make a parameter-less call to super() as the first statement in the constructor body.
class MyCustomElement extends HTMLElement {
  constructor() {
    super();
  }
  // our custom element code
}
Once we have our custom element class ready with all its features and behaviour already coded, we need to define the custom element. So the full example would look like this:
class MyCustomElement extends HTMLElement {
  constructor() {
    super();
  }
  // our custom element code
}

customElements.define('my-custom-element', MyCustomElement);
If you're a one-liner lover, the one-line version is possible by using an anonymous class:
customElements.define('my-custom-element', class extends HTMLElement {
    constructor() {
      super();
    }
    // our custom element code
  }
);
Apart from the define method, there are other methods available in the customElement object:
get(name): If a custom element with the given name it has been defined, it will return its constructor, otherwiseundefinedwhenDefined(name): Returns a promise that will resolve when the custom element with the given name is defined. It will reject if the given name is not valid or no custom element exists. This method can be used to avoid executing an action until the target custom elements are defined.upgrade(): Allows upgrading elements. Elements are automatically upgraded when they become connected, but this method can be used if you need to upgrade before you connect the element. It's not very common to use it but it's available when needed.
Notice that we are using the customElements object directly without defining it. That's possible because this object is available on the global Browser Window Object window. This object is always available in the browser environment in the global scope. When the JavaScript engine doesn't find a variable in the current scope it finds them in the global one, and specifically in the window object. That's why, in our case, typing customElements.define(...) and window.customElements.define(...)is the same.
It's also worth mentioning two other important features that we might cover in a future article - forms and accessibility features.
To make a custom element a form-associated custom element, just add the following static method (returning true)
static get formAssociated() { return true; }
On the other hand, the ElementInternal interface has functions and properties useful both for form elements as well as for accessibility features. To get an instance of it, call the attachInternals() method:
this._internals = this.attachInternals();
You can get more info about ElementInternal on the WHATWG site (Web Hypertext Application Technology Working Group).
Finally, it's important to highlight some key points that need to be taken into account when creating custom elements:
- The name of the customs element must contain a hyphen/dash (-), therefore, it has to be formed of at least two words. This requirement was defined in order to make the HTML parser able to distinguish custom elements from native ones. As you probably have already realized, native elements tags are "one-word" tags.
- The name of the custom element must be in lowercase, i.e. it has to follow the kebab-case convention.
- The name of the tag and its class, doesn't have to be the same, but it's recommended for them to coincide. For clarity, some authors, like to add the Component sufix to the class name.
- Tags can not be registered more than once, so, obviously, different custom elements cannot share the same tag definition.
- Custom elements cannot be self-closing by definition. Only void elements can be self-closing. You can read more about self-closing elements and their complete list in the official HTML SPEC
To be clear about naming custom elements, let's take a look at some invalid/valid examples:
<mycomponent>--><my-component><MyComponent>--><my-component><My-Component>--><my-component><MyCustomComponent>--><my-customcomponent>or<my-custom-component>
Attributes
Attributes are a HTML related concept. Attributes are the way we define the characteristics of an HTML element, i.e., an HTML tag. The same applies to Web Components.
In the example below, src, alt, widthand height are attributes.
<img src="/img/profile/MartyMcfly.png" alt="A profile picture of Marty McFly" width="200" height="200" />
When the browser engine parses the HTML code to create DOM objects, it recognizes standard attributes and creates DOM properties from them. It's worth to highlight that this only occurs with standard attributes, not with custom ones. Please note that standard attributes are not the same for all elements. For instance, idis a standard attribute common for all the elements, while alt attribute is exclusive of <img />.
For the custom attributes that are not automatically reflected properties, as well as for operating with attributes in general, we have the following set of methods available:
element.hasAttributes(): Checks whether the element has attributes or not.element.hasAttribute(name): Checks whether the element has the attribute with provided name.element.setAttribute(name, value): Checks the attribute called name with the given value.element.getAttribute(name): Return the value of the attribute called name or null if it doesn't exist.element.getAttributeNames(): Returns an array of the element's attributes.element.toggleAttribute(name): Toggles boolean attributes the following way: removes them if they exist, creates them if not.
One thing to be careful about is defining your own attributes for the web component. They don't have to collide with any native attributes and shouldn't confuse the developer about their nature (native or custom). On the other hand, it's important to highlight that attributes should be used only with primitives types as string, number and boolean.
Listening to attributes changes in web components
When developing a web component, we'll probably need to execute actions when some attribute change. For instance, if we have a value attribute and this is set, we'll want to render its (new) value. The custom elements API brings us a way to observe attributes changes. It consists of two related methods: observedAttributes and attributeChangedCallback.
The first one is where we define which attributes we want to observe. To do that we have to return an array with the names of the attributes. In the following example, we want to observe changes in attributes called value, min and max:
static get observedAttributes() {
  return ['value', 'min', 'max'];
}
The other method allows us to execute actions when an attribute has changed. It takes into account three parameters:
- The name of the attribute that changed and therefore has fired the callback,
- The old value of the attribute that changed,
- The new value of the attribute that changed.
Find below an example of a attribute called "value" that has changed from 7 to 11:
attributeChangedCallback(name, oldValue, newValue) {
  // name will be "value"
  // oldValue will be "7"
  // newValue will be "11"

  // your code...
}
Properties
Properties are a JavaScript-related concept. They are part of the DOM Node interface, an abstract base class upon which many other DOM API objects are based (more info about it in (MDN Web Docs). They are used to access to DOM Node interface features, like Node.parentNode, Node.childNodes, Node.className and many more. We can also define our custom properties, to define the custom behaviours of our custom elements.
Properties can have any value and they are case sensitive.
Reflecting properties to attributes (and vice-versa)
In some way, we have already described the relation between properties and attributes. Properties are the Javascript representation of HTML tags attributes. Meaning that when an attribute is modified, we expect that its property value will be also modified and vice-versa.
You can check this behaviour with the following snippet, where you will see that the src attribute will change after modifying the property value (after 1'5 seconds to be able to see the original value).
<img id="myImg" src="yourPicture.jpg"/>
setTimeout(() => {
  document.querySelector(# myImg').src="otherPicture.jpg";
},1500)
As previously mentioned, the browser engine creates properties for those standard attributes that it recognizes, but not for the custom ones. For the custom ones, we need to do it explicitly when defining our custom element.
We could do that by defining getter and setter methods for the properties we would like to reflect its value to its namesake attributes. To do the magic, we need to set and get the attribute value under the hood.
Let's suppose that we have a custom element whose class has a property called color that we want to reflect its namesake property. Give this scenario, the code would be the following :
//'this' is pointing to the custom-element declared class
// that extends from HTMLElement, that's why has the
// 'setAttribute' and 'getAttribute' methods available

set color(value){
  this.setAttribute('color', value)
}

get color(){
  this.getAttribute('color')
}
Behind the scenes, what is happening is that when we execute this.color = 'blue' what is really being executed is a call to color's set method with a param value of 'blue', which will set the attribute's value to 'blue'. On the other hand, when we execute this.color what is really being executed is a call to color's get method, which return the attribute's value.
If you don't remember well how property getters and setters work, you can have a look at MDN Web Docs
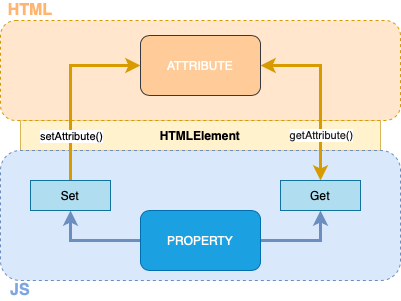
All these attributes and properties are a bit hard to understand by just looking at the code, it will get easier once you'll see it working in a real custom element, something we'll do in the next chapters. Meanwhile, remember the trick to achieve reflection: linking get/set property methods to get/set attribute methods
Maybe this schema will help clarify how attributes and properties reflection works:
Conclusion
We had a great tour of the minimum we need to build a web component. So far we know how to define a custom element and its attributes/properties. In the next chapter, we'll talk about templates, slots and ShadowDOM vs LightDOM.
Make sure to read the first article of this series as well:
Don't forget to sign up to WorkHub for more articles like these!
Rafa Romero Dios
Software Engineer specialized in Front End. Back To The Future fan
See other articles by Rafa

WorksHub
Jobs
Locations
Articles
Ground Floor, Verse Building, 18 Brunswick Place, London, N1 6DZ
108 E 16th Street, New York, NY 10003
Subscribe to our newsletter
Join over 111,000 others and get access to exclusive content, job opportunities and more!