Server Side Rendering React Components as a Service
Wing Leung
27 Sep 2018
•
5 min read

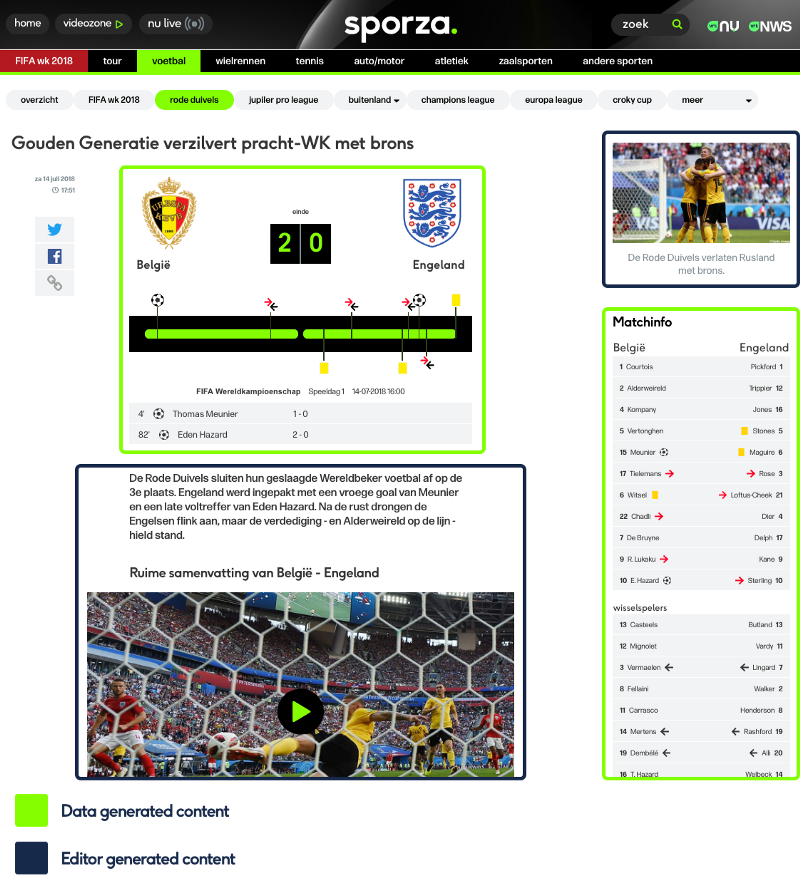
Sporza.be, a Belgian sports platform, needed a redesign to meet up with current standards and to migrate to a new CMS called Adobe Experience Manager or AEM for short. Alongside every feature available on the legacy platform we needed to find a way to provide sports data to our audience from our big data service, which aggregates data from third party suppliers e.g. scores, rankings, live events,… but also custom data fed by our editors e.g. sports coverage, custom stats… this is where the challenge began.
Articles and Components library
When you take a look at the core content types of a sports platform, often there are 2 overall types. Articles, directed by our editors and (interactive) components visualizing sports data. More often than not editors do not need to handle sports data. It’s all automated, aggregated and available through our in-house sports API. Beside the fact that those components are sports related, they do not necessarily have to be in the same code base as the one responsible for managing sport articles.
Given the complex nature of handling big data like this, rather than integrating components in our CMS, which contain our article structures, we chose to create a library so we could manage our sport components separate from the CMS. Meaning we could build and deploy faster without the weight of an enterprise CMS. Because of this separation of concerns the components are not bound to the CMS and could easily be shared across our other platforms. Or if we need to move to another platform, the transition would be easy because we broke down our business features into several independent working entities. In case the CMS changes, our sport components do not need to be ported. Same if we choose not to use React.js for our sport components anymore, we could upgrade our components separate from our CMS. We could even upgrade component by component to another framework without having to break anything.
Server side rendering
One of our requirements was that we needed to visualize the data as fast as possible when the user requests a page. SSR is perfect for this case, letting us render the initial state of our components on the server, so that the user will see the content immediately upon loading the page without having to wait for the javascript to kick in, fetch the data and rendering the the data into a styled component. As the page progresses the statically loaded HTML will be hydrated into an interactive component again, as a result we have the benefits of both SSR and React.js interactivity.
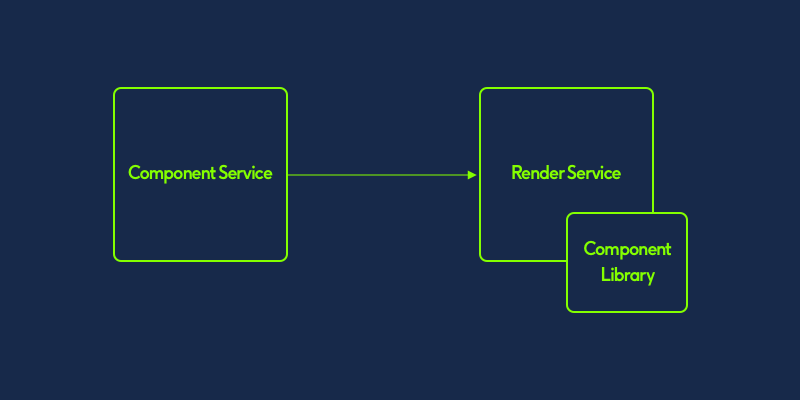
So we have our components library, which contains all the React.js components, now we need to figure out a way to serve our components. To do that we use Airbnb’s Hypernova library to create a rendering service which is a Node.js microservice using Hypernova and our components library. The sole purpose of this rendering service is to handle its incoming requests and serve the react components initial state accordingly, setting the properties we were given in the incoming request.
Next to our rendering service we also created a Node.js microservice we called components service as a controller to our rendering services. This component service would be the endpoint where other service would communicate with to fetch a server side rendered component. In this components service we process incoming parameters, fetch data from our sports API and pass the properties along to the rendering service. The response would be the initial state with data.
How it all falls into place on the page
Now that we have a way to fetch the initial state of a component, let’s take a look at how this all comes together on the page and how we’ve setup our components delivery to rollback easily.
The components service will not only serve the components HTML but also the HTML tags necessary to load our external CSS and javascript files for our components. Those HTML tags are essentially just two stateless React.js components in our components library with URLs pointing to the versioned CSS and javascript file which are available on every deploy of our components library. The version used here is also the version defined in package.json.
Because of this type of versioning we ensure the components always match with the right CSS en javascript file and this way we can control which version of the components library we use by just updating the dependency to our components in the render service. Not only making our rollback strategy easy but also allowing us to set the cache age on the CSS and javascript files to infinity, or in our case one year. Theoretically, browsers should also pick this header up and cache the files for up to a year as well, which in turn make for a faster UI delivery and hydration of the components.


We chose not to use CSS-in-JS but instead opted for separate a CSS file. This makes it easier to share common sass files with our CMS for configs, mixins, placeholders,… for example we have a component in our page header next to a menu, these menu items have hover states. If we share this hover state definition in the form of a placeholder we defined in one central place, it makes it easier to maintain on both repos. Other benefits of using sass over CSS-in-JS are smaller initial state html, fast delivery due to parallel http/2 downloads and faster rendering due to not having to wait for the JS to render the styling, it’s already there more often than not in browser caching.
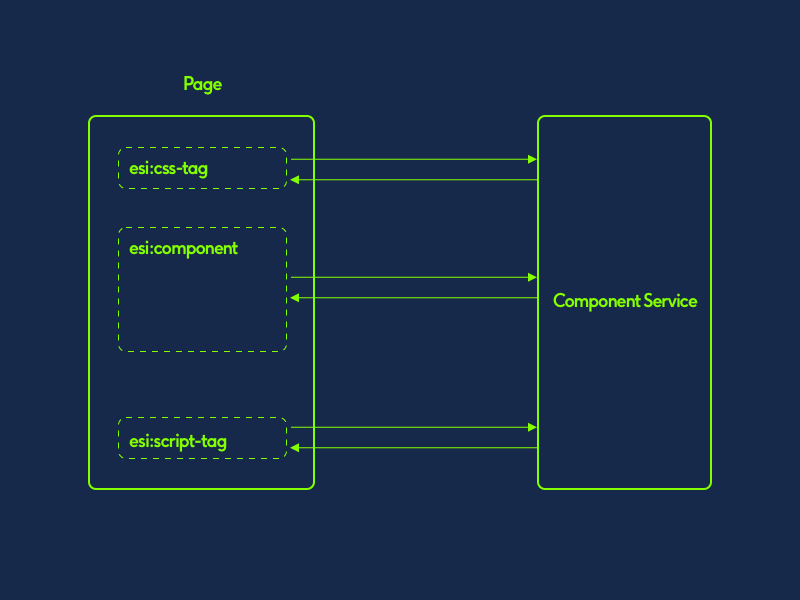
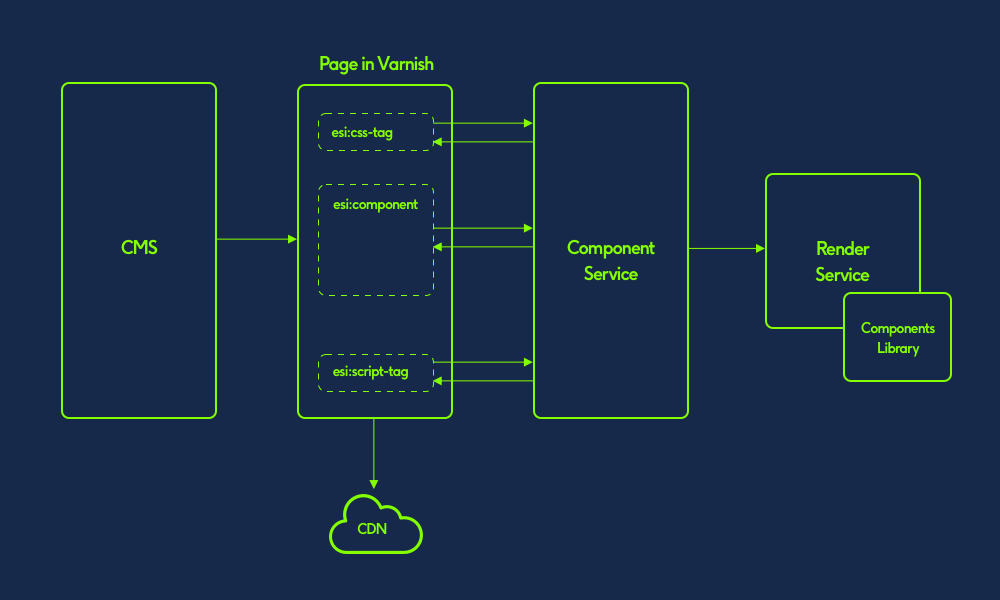
Edge side include
To include these snippets on our page we use Varnish’s Edge Side Include or ESI for short. ESI and everything from CMS leading up to ESI is a whole other topic to write about so I won’t get into too much details. With ESI we define placeholders on the page in the CMS, every placeholder has a URL, Varnish will fetch the content from the defined URL and put its content into the placeholder before sending it to the client. So the CMS needs to be able to construct an ESI-tag with the placeholder URL and its arguments, pass it on to Varnish where the ESI magic will happen before passing it down to the user.

Conclusion
With all the above we managed to create a service that delivers us everything we need to include our React.js components and its CSS and javascript to our page and rehydrate it when it’s loaded in the browser.
By doing so we managed to break down our complex structure into manageable nodes in our architecture separate from our monolithic CMS. Giving us the benefits of faster continuous deployments and a better developing experience for our components.
Wing Leung
See other articles by Wing

WorksHub
Jobs
Locations
Articles
Ground Floor, Verse Building, 18 Brunswick Place, London, N1 6DZ
108 E 16th Street, New York, NY 10003
Subscribe to our newsletter
Join over 111,000 others and get access to exclusive content, job opportunities and more!