Web Components API: Lifecycle Events and Custom Events
Rafa Romero Dios
13 Jan 2022
•
6 min read
Once again we have a new issue of our Web Components series. As per usual, let's start with a summary of what we have seen so far in order to get the context and prepare ourselves to what we will learn in this new chapter.
Until now we gained a solid foundation about what a web component is, we have seen a part of its API, specifically the one related to how to define them, attributes, props and probably the most important one: ShadowDOM and LightDOM.
Now it's time to talk about Web Components' lifecycle through their lifecycle events or as many people call them: lifecycle hooks. Related to that, it's also a good time to talk about native events and how to trigger custom events.
Note, as briefly commented before, there are a lot of ways to called these lifecycle "things": lifecycle events, lifecycle methods, lifecycle callbacks and even lifecycle hooks (fault of React :P).
Today we'll enjoy a more theoretical article but at the same time, more lightweight and shorter compared with the lasts ones.
Web Component lifecycle methods
The best way to talk about a topic such as lifecycle methods is to use a picture, because as commonly said - a picture is worth more than a thousand words. So let's see a diagram that sums up really well how lifecycle methods work and are executed, along with other methods:
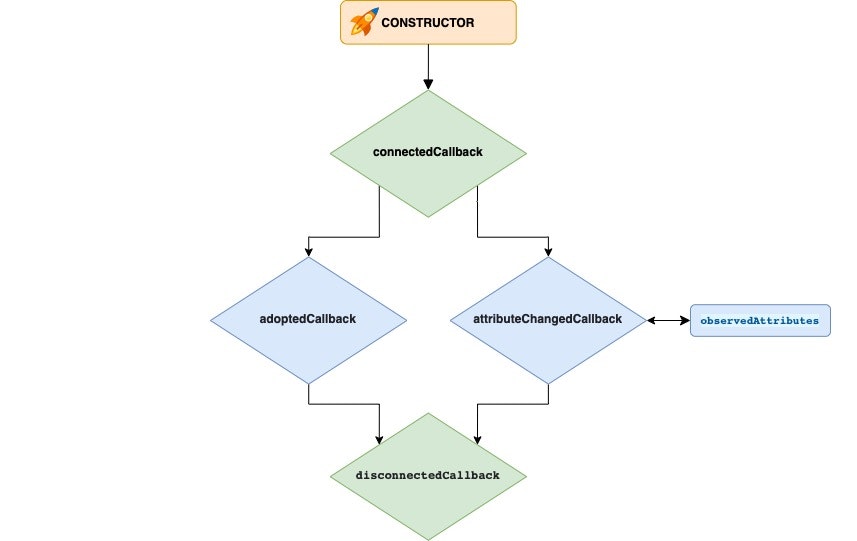
We would like to clarify that we only see some code in the case of attributeChangedCallback as it's the only one that is executed with params.
We have a live demo provided by MDN Web Docs very useful to see in action all these methods and understand better when each one occurs over time: Life cycle callbacks test
So based on the picture, we have:
constructor
Invoked when we create our web component. It is where we establish the prototype chain (remember, pointing to HTMLElement parent class). It is also where we initialize all the needed stuff that is needed by our component and finally where we will add a shadow root to our shadow host (web component) using the attachShadow method.
The things described before are the only ones recommended to execute in the constructor and other actions like fetching data or rendering are not recommended here but in connectedCallback method
connectedCallback
Invoked every time the web component is connected to the DOM (Document Object Model). When we say connected what we mean is that the web component has been appended to a Node that is already connected to the DOM. A connection could be also a movement of the node.
This is the place (the moment) suitable for fetching data or add event listeners.
Related to connectedCallback, we have a very useful attribute part of the Node API called isConnected. It is a read-only attribute that returns a boolean indicating whether the target node is connected or not to the Document object (in the normal DOM) or to the ShadowRoot (in the case of a ShadowDOM). Please find more information about this attribute in the MDN Web Docs page
adoptedCallback
Invoked every time the web component is moved to a new Document. This applies specially to iFrames.
attributeChangedCallback
Invoked every time a web component's attribute is added, changes or is removed.
It takes three parameters:
- In the first place, the name of the attribute that has changed and therefore has fired the callback.
- In the second place, the old value of the attribute that has changed.
- In the third place, the new value of the attribute that has changed.
Find below an example of a attribute called value that has changed from 7 to 11:
attributeChangedCallback(name, oldValue, newValue) {
  // name will be "value"
  // oldValue will be "7"
  // newValue will be "11"

  // rest of your code...
}
In order to define which attributes will trigger this method, remember that the custom elements API bring us a way to define them: observedAttributes
This methods is where we define which attributes we want to observe. To do that we have to return an array with the attributes names. In the following example, we want to observe changes in attributes called value, min and max:
static get observedAttributes() {
  return ['value', 'min', 'max'];
}
disconnectedCallback
Invoked every time the web component is disconnected from the document's DOM. This is the place suitable for remove event listeners.
Listening native events
When we talk about native events we are referring to those events that are part of the offical API and most of them are triggered by user actions: click, hover, blur, etc.
We will talk about this topic in this issue because to work with events, we need to use basically two methods:
addEventListener: given an element, used to attach a handler to be executed when a specified event is triggered by this element
  connectedCallback() {
    // other component's code

    //$myElement was obtained in constructor
    this.$myElement.addEventListener("click", myHandler);

    // other component's code
  }
removeEventListener: given an element, used to remove a handler that would be executed when a specified event was triggered by this element
  disconnectedCallback() {
    // other component's code

    //$myElement was obtained in constructor
    this.$myElement.removeEventListener("click", myHandler);

    // other component's code
  }
We didn't dig too deep in the APIs today, but if you want to know more you can check MDN Web Docs both for addEventListener and removeEventListener.
When working with Web Components, it is recommended, i.e. it is a best practice but not mandatory, to execute these methods in a specified moment.
addEventListener should be executed in connectedCallback meanwhile removeEventListener should be executed in disconnectedCallback.
Remember that for the removeEventListener to take effect must be executed with the same parameters (specially the same handler) as it was called when adding the listener.
Creating and triggering custom events
Native events are the main way we have to add interactivity on the web as we execute some code based on the user action: for instance we run some process when the user clicks somewhere (click event) or we validate a field when the user type on it (on focus event).
The same way, when we are developing a web component, we have to trigger events because of the following reason: Events (therefore triggering events) in some way are part of the public API of the component, and let the developer (i.e. the consumer of our web component) to integrate better the component on the site. Events are a powerful tool that benefits indirectly to the final user since with the info provided by the events the developer can act in consequence with the rest of the page as well as with the final user.
Events are used to inform about the life and status of the component. We can use events to inform, for instance:
- about when some data has been loaded
- a value in our component has changed
- an item / option / whatever has been selected
- an item / option / whatever in out componenent has been removed
- In general, any state of our component has changed
Since we have already seen the goal of the components, let's look at some code. We will go trough how to create and trigger them, but we won't go deeply into topics such as bubbling, capturing, as they are not part of this tutorial's scope. To know more about it, visit MDN Web Docs: Creating and triggering events.
So first of all, we need to create our event. We have two ways of doing it. The simple one, where we are not able to add payload (data) to the event, and the second one, where we can do so.
The second way is specially useful where we don't want to inform just about a state change but how this state has changed. For instance, if our property value has changed, we will probably want to inform about the new value. To do so we need to wrap our data in an object with a special structure, as you can see below.
/// simple way
const event = new Event('myComponentValueChanged');

// complete way
const event = new CustomEvent('myComponentValueChanged', { detail: elem.value });
To trigger the event, we can do it the same way for both cases:
elem.dispatchEvent(event);
Conclusion
With this article we have covered the most of the WebComponents' API and therefore the most of the theory we need to develop them. The only thing that's missing now is in how many ways we can style web components.
With every additional article we are closer to being able to create our web component, so make sure to follow this series! Once we finish the theory and get to know the tools we have to build web components, we will be ready to build ours, so stay tuned and make sure to subscribe to our newsletter so you don't miss any new articles!
Rafa Romero Dios
Software Engineer specialized in Front End. Back To The Future fan
See other articles by Rafa

WorksHub
Jobs
Locations
Articles
Ground Floor, Verse Building, 18 Brunswick Place, London, N1 6DZ
108 E 16th Street, New York, NY 10003
Subscribe to our newsletter
Join over 111,000 others and get access to exclusive content, job opportunities and more!